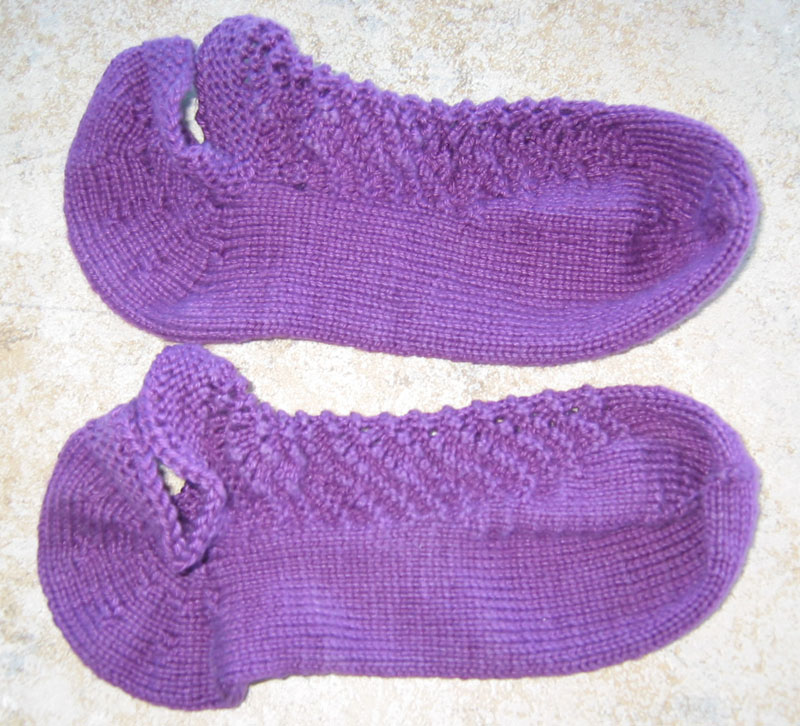
FO: Fancy Feet Anklets – “Monday”

Fancy Feet Anklets: Monday
It’s been a busy summer and I haven’t done much posting of late. Now that summer is winding down along with the Labor Day weekend, I intend to post a bit more often. So I will start with my latest FO. Awhile back, I purchased the “Fancy Feet Anklets” kit from Knit Picks. This kit contained 7 balls of Comfy Fingering weight yarn in 7 different colors and a set of 7 patterns, one for each day of the week. The idea being that you have a pair of anklets for each day of the week. Now, I have to confess that this kit has been hanging around it my stash long enough that it is no longer available on the Knit Picks website. (I just checked.)

I started knitting one of the patterns in the kit (Monday) earlier this summer when I was looking for a small, portable knitting project to take with me here and there as we traveled throughout the summer. This was a perfect portable project. The Monday pattern is a feather and fan type lace pattern. I used the colorway Blackberry and size US 0 (2.00 mm) circular needles, 47 inches long so that I could do magic loop and two-at-a-time. Now, because this is a lace pattern, it does require keeping track as you knit. The anklet is knit toe-up — which is not my preferred method for doing socks — but I think it is the most practical way to knit this type of short ankle sock.

Monday 2 anklets Monday anklet
A couple of comments/notes to myself for the next pair: The socks seem a bit too tight across the middle of my foot, so I think I will knit the next pair on slightly larger needles. The socks are also a wee bit short for my size 8.5 foot, so the next time I will knit them about 1/2 longer before starting the heel. The heel on these anklets is made by doing 60 short rows (yep, 60). You really have to keep track of where you are in the pattern when knitting the heel. I found it best to do the heel in one long stretch of knitting rather than attempting to stop somewhere in the process. I also have decided I really don’t like the wrap and turn technique used for the short rows, so the next pair will be knit using a different technique.

I like the socks, but since they don’t really fit me, my sister (who has smaller feet) will be getting this pair.

Related Post

Part 1: Freeing Yourself from a Written Pattern or How to Use the Yarn of Your ChoicePart 1: Freeing Yourself from a Written Pattern or How to Use the Yarn of Your Choice

In my last post, I discussed the issues related to trying to substitute one yarn for another and suggested at the end of my post that if you want to use a yarn of a different weight & gauge than what the pattern calls for – you can design your own custom sweater using the pattern as a guide.
Today, I will focus on the first of two approaches for doing just that. WARNING – you must be prepared to take measurements, do a proper gauge swatch and get out your calculator. Yes, we will be doing some math…

Approach #1 – Use EZ’s Percentage System.

Elizabeth Zimmerman published her “unvented” percentage system for designing sweaters in the Knitting Workshop and gave us many examples of how to use it in her other books. EZ was always someone who dealt with knitting in a pragmatic fashion and basically cut through all the fluff and gave clear explanations of basic concepts. I encourage you to read all of her books – but if you want the complete explanation of her percentage system — Knitting Workshop is the source.

I am describing EZ’s Percentage System for two basic sweater designs – the yoke sweater and the Raglan sleeve sweater. Both are knitted in the round. You need to take some basic body measurements:

Width around the chest (Chest Measurement) [CM] The Chest Measurement is the “Key Measurement” (100%) and the starting point.
Body length to Underarm (Underarm Measurement)
Sleeve length to Underarm (Sleeve Length)
You must know your stitch gauge or Stitches per Inch [SPI]

The math follows:
CM X SPI = # stitches needed for the body of the sweater.

For a Yoke Sweater the basic percentages of the above are:
Body = 100%
Wrist = 20%
Upper Arm = 33%
Underarm = 8%
Circumference of Shoulders = 133%
Neck = 40%

For a Raglan-Sleeve Style Sweater the basic percentages are:
Body = 100%
Wrist = 20%
Upper Arm = 33%
Neck = 40%

To calculate – multiply the total number of body stitches by the percentage.

I think you get the idea. If you want to try using EZ’s percentage system, I recommend you either borrow EZ’s Knitting Workshop from your library or a friend or purchase it.

Here’s a link that will take you to Amazon.com: Knitting Workshop

I have also created an Excel Spreadsheet that will make the calculations for you. You can download it here: EPS_Calculator Spreadsheet.

Next post, I will outline another approach to sweater design.

Master Knitter Level I – Swatches #4, #5, & #6 – IncreasesMaster Knitter Level I – Swatches #4, #5, & #6 – Increases

Swatches 4 through 6 in the Master Knitter Level I program are all about increases. Specifically, each swatch demonstrates a particular type of increase. The increases are done on each side, with three stitches before the right edge increase and three stitches after the left edge increase.

Bar Increases

Swatch 4 - Bar Increase

Swatch 4 demonstrates the Bar Increase. This is probably the increase most knitters first learned to make when knitting. It often written as “KFB” in patterns — which means “Knit in the front and back loops”. When you knit into the front loop of a knit stitch and then knit in the back loop of the same knit stitch, the resulting increase has a purl bump where the second stitch was made. It is clearly visible as you can see in this picture.

I learned a few things working on this swatch. Since I am now much more aware of my tension, I found that the purl bumps looked much better if I made certain I kept the tension even with both stitches. It’s much the same issue as when I had trouble getting even tension in ribbing.

Also, through my research, I learned that you should never make your increases on the very edge of your knitting — you should have at least one stitch on the edge before doing the increase. This makes it much easier and neater to do seams. This is something to pay attention to when you are knitting pieces that will be sewn together — I know I will practice this in my future knitting projects.

Swatch 5 - Knitted Make 1 Increases

Swatch 5 - Make 1 Increases

Swatch 5 demonstrates Make 1 increases. On the right edge, I knit an M1R increase — which means “Make 1 Right” — this is a right-slanting increase. It is made by inserting the left needle from the back and lifting the horizontal strand between stitches onto the left needle and knitting into the front of this strand.

On the left edge, the increase is an M1L — which means “Make 1 Left” — a left-slanting increase. It is made by inserting the left needle from the front and lifting the horizontal strand between stitches onto the left needle and knitting into the back of this strand.

M1 increases are tighter and there is no purl bump on the front of the knitting.

Swatch 6 - Lifted Increases

Swatch #6 - Lifted Increases

Swatch 6 demonstrates the Lifted or Raised Increase. This is the most invisible of increases — and was an increase I had never used before, so the entire swatch was a learning experience.

Again, I knit a right-slanting increase on the right edge. This increase is done by lifting the stitch below the stitch on the left needle and knitting it.

The left-slanting increase on the left edge of the swatch gave me the most difficulty. I had to search out several different pictures of it in my references before I figured it out. The left-slanting lifted increase is done by lifting the stitch below the stitch just knitted on the right needle and then knitting it.

The best pictures and explanations I found of this increase, as well as the others, were in an online article at Knitty.com, entitled “Techniques with “Theresa – Increases”.

So, these three swatches improved my technique when knitting increases and I learned a method of increasing that I had never used before. Check out the article on Knitty.com if you want to explore these methods.

Nearly Identical Twins…Nearly Identical Twins…

Last month, the Yarn Harlot posted an article on a pair of identical twin socks that she had made. As those of us who knit with self-striping/self-patterning yarns know, getting a pair of socks that are totally identical is nearly impossible — but this pair turned out to be completely identical. (I was impressed…)

This morning I was putting away my pair of striped socks that I had knit with Paton’s Kroy self-striping sock yarn — and noticed that while I had not gotten a completely identical pair of socks — they were nearly identical — being off only a few rows of striping. So I took a couple of pictures:
StripedSocks_Twins1StripedSocks_Twins2

How’s that for a pair of twins?